A word of caution:
Backing up is a very personal and important process, this is my strategy and approach, if you feel like any of the information is misleading please let me know so i can correct and update it. For a detailed understanding of how I came to this strategy please see the Post about Backups
I have been using this software for a long time before writing these guides, and already have been suggesting it to other professionals. So I have setup links to Goodsync with an affiliate code, I do appreciate anyone using the links and hope it works as well for you as it has for me.
Don’t feel like reading?
If your not into reading you can watch my step by step example of this process on this youtube video. Coffee Recommended.
Overview and Approach:
The approach we will take from Camera to Computer is one that we totally understand and control, even when automation is involved we still control what occurs, but this is carried out in a way that minimizes hardware risk and human error.
The approach is to not use “Write” commands to any media until it is backed up, ensuring that there are always two copies of files from as soon as possible. Likewise at any moment the method we use can be interrupted and by observation alone understand where we were and resume the process or understand if files and data is backed up on not.
What you need:
- A camera with two SD Cards. (I will put notes on how to do this with only one)
- Two External HDD’s
- Laptop or computer
- Synchronization Software (I have settled on GoodSync After testing a few other solutions.
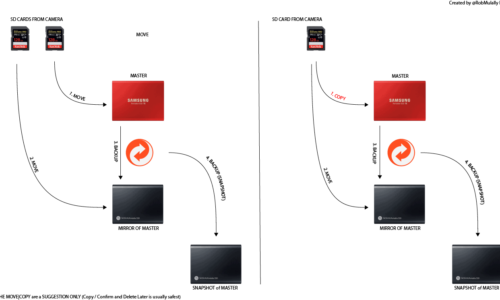
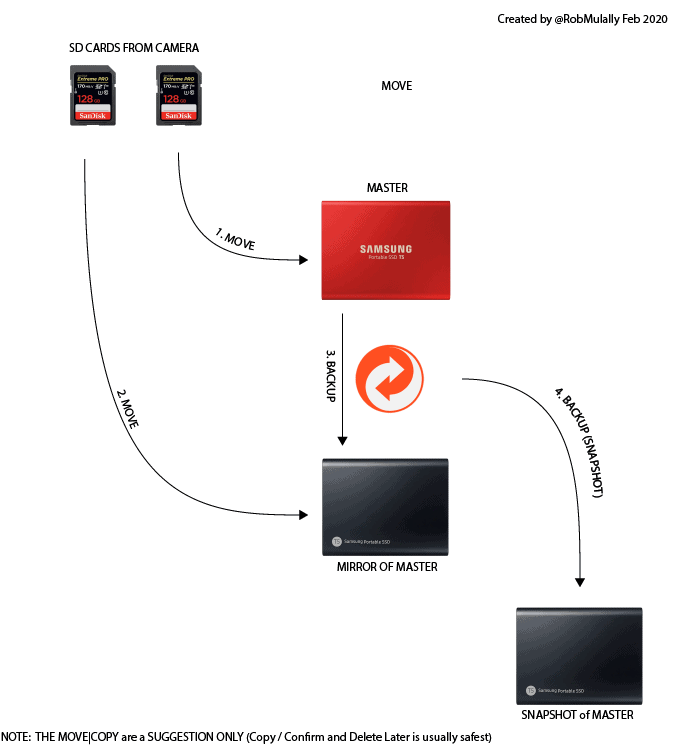
Diagram of Dataflow with Explanation:
(Diagram) showing SD cards and HDD’s etc
Setup
Setup Step 1: Drives and folders: (This is only needed to be done once.)
Setup the HDDs with folders, we will name the first HDD and the second the same name with “_Mirror” at the end. For example “Travel2020” and “Travel2020_Mirror”, and within those HDD you can create two folders with the same names so you will end up with.
- Drive1(Travel2020): \Travel2020\
- Drive2(Travel2020_Mirror):\Travel2020_Mirror\
You can either chose to Format the drives with your native file system (HFS+ Mac or , NTFS, Windows, or use exfat ) Currently i use exfat on portable drives to have the flexibility to use drives on another computer as needed but on large volumes at home I use the native filesystem to ensure security and performance (indexing). I also have Paragon Windows HSF+ Drives installed on my laptop to use Mac drives if i need. (You can also go the other way if your working in an mixed environment)
Why? We have named the second drive and the second drive folders with an extra word Mirror to ensure that if we plug one of these drives in later in error we know which is the source and destination drives, this can avoid editing the wrong files or copying to the wrong location, I usually only plug in one at a time unless i’m synchronizing to avoid human error.
Setup Step 2: GoodSync Step by Step
- Create a new Good Sync Job
- Set the Job Name (Continuing with our example lets called it “Travel2020 – Portable”
- Select if you want to Synchronize or Backup, for this use I almost always select Backup.
- When the job is created you need to pick the source and destination folders, the Left and Right folders, essentially Source and Destination, you want to select the Folders Left we created before Drive1: Travel2020 and Right Drive2: Travel2020_Mirror
- With Good sync you can click analyse and it should say the folders match.
- (Optional) There is one last setting I personally turn off and that is in the Job Options, I uncheck “save files to recycle bin“, this stops good sync keeping a copy of the files we overwrite (you can decide to leave on or off, I personally just want them synchronized and don’t want a history or backup of files I’ve deleted. I turned this off the first time i noticed my backup drives were filling up faster than the main drive.
- You should put a dummy file (Create or copy a file to the Travel2020\ folder . Now select the job you have created and click analyse. You will see there is 1 file different, and click sync to synchronize , its this report that will tell us whats about to happen before we synchronize anything, making sure we only are deleting when we expect to and taking notice of the copy of files from left to right is how we ensure we are not making an mistakes and getting all the files over we just captured.
I have created a step by step guide on how I use GoodSync in this video , I highly recommend it if this is resonating with you.
Workflow
Workflow Step 1: Moving the files
If you have two SD cards, take the first SD Card and Move all the files of the SD Card to Drive1\Travel2020\ProjectName\Day\CameraName , you can use your folder system here, I personally just put them under a descriptive name like “2020-01-10-TestProject-Day1-GH5” in the project folder and sort later as required.
Note if you have only 1 SD Card you will want to “Copy” the files to the drive and not move them, them after the files are “copied” Create a folder on the SD Card with same name like 20200110-TestProject-Day1-GH5 , then move all the files into that folder. Then take that folder and Move it to the Second Drive.

If you have 2nd SD card, you can do the same as the first step but move the files to the SecondHDD so it will be moved to Drive2\Travel2020_Mirror\ProjectName\
If you only like to travel with 1 HDD there is an alternative option to follow the 1 SD card step and leave the folder on the SD card rather than move it to the second drive, this will result in the HDD filling up.
NOTE: IF you follow the steps in the order above, you will “Know” what step you are up to , the most important thing is if you create the folder only AFTER you copied the files to Drive1, you know that you have a copy of the files if you get interrupted, Likewise you know the remaining folder still needs to be moved to a mirror drive or verified its has been synchronized.
Paying close attention to the ORDER you do things will mean that when you are tired after a long day of shooting or on a job and a little rushed you won’t make any mistakes. So it might feel slow or redundant but not “relying” on software, and keeping the steps “Simple” and easy to notice if you have or have not completed a step is very important.
Another advantage of having a simple and robust proccess is if you return to an SD card in the future, you are unlikely to have photos on it and if you do they will be in folders with descriptive names that will help you locate and confirm they are backed up before deleting or formatting the card.
Workflow Step 2: Using Goodsync
Once we have moved all the files we can use GoodSync to verify the folders match and if not we need to look closer to understand why.
Once we start editing the files/moving them, creating lightroom catalogs etc, we can then use the SYNC in good sync to keep the folders the same, I choose to do this manually, not on a schedule or automated for the reason that I want to check what is being backed up before it happens.
Notes:
- If you choose to implement your own variation of the workflow you may Sync to a drive and leave a copy of the folder on the second SD card, thus having a third copy.
- At home I have experimented with automatic backups which worked well, but I like the conformation process so I only allow automatic backups if i’m using a “Snapshot” drive.
- I highly recommend watching my How i use GoodSync video (Coming soon) I talk through my steps and why I have settled on each process.
Safeguards
At the outset we set a few guildines to ensure we followed here I just wanted to point out how we achieved those:
- We have name the drives and folders to ensure we know which ones we are working with.
- We have a sync program that lets us “see” what is about to happen so we can fix any issues before we “backup”
- We have designed a process for 1 or 2 SD card cameras that ensured we only ever “write” information to the SD cards when there are two copies.
- We have also ensured we have a way to clear the cards, or if data is left on the cards we can identify quickly if it has been backed up or not through the creation of matching folder names.


